Friday, August 17, 2012

Coconut Southern Comfort Layer Cake


I get more excited over other people's birthdays than my own.
I can't wait to see what cake/dessert they'll pick to enjoy on their very special day.

Birthdays are a day to celebrate, and what would a celebration be without cake!
And lots of it.

Baking someone their favorite treat on their birthday makes them feel like they are important, and they deserve the best on their day. It makes them know that their choice is the only one that matters.

I love that moment when I present a cake or pie to someone on their birthday and see their face light up with happiness. That's what makes it all worth while. Just to make sure they know how important they are to you.

It's like this cake is exactly what they wanted and it's exactly what they will get because gosh darn it they lived to be another year older and that is something to celebrate!

Celebrating life is so important. We should do it more often than once a year.
More cake! More joyous celebrations for all!

This Coconut Southern Comfort Layer Cake is exactly what is sounds like. 
Southern. Coconut. Layer. Key words.
 
 In the South, we don't make small cakes for birthdays. Or for any day for that matter.

This cake embodies the South. Its big. And full of butter and sugar.
And I mean full of it. I winced a little at the ingredients list.
And with eight layers and a coconut flaked exterior, this cake makes a statement.

It's all about an impressive presentation of a giant cake that will make everybody oooh and ahh.
That's what its allll about on birthdays. The wow factor. The absolute best and greatest for the birthday boy/girl.

Baking the cake is simple, just make sure you have a BIG mixing bowl and lots of counter space.
It's the assembly that can be a bit scary.
But you can totally do it. Don't be scared! Conquer the cake

You're gonna need four cake pans.
I know you're probably thinking Um dude, I only have two like any other normal person.
But do not fret, you can pick up a couple disposable pans at the grocery store.
Problem solved.


 Cakes aline, ready for the oven!

 Crispy, toasted coconut. Smells amazing in my kitchen

Outta the oven, onto the cooling racks.
Now the impatience kicks in when I have to wait for them to cool before I can start icing. Hmph. 
 I just turn the fan on high to speed up the process ;)

 Cakes, Assemble!
Oh, and the recipe calls for Southern Comfort, but I didn't have any available so I substituted dark rum instead. Twas an easy fix

 Eight golden layers. I'd like to call it the leaning tower of sweet coconutty goodness.
Flows right off the tongue

 Viola! Crispy coconut flakes make for an elegant topping

 Once you master this cake, you're well on your way to becoming a real Southern Bell.
Oh this ol thing? Nooo I just threw it together in a jiffy!

Coconut Southern Comfort Layer Cake


Ingredients:

Cake
2¾ cups cake flour plus more for pans
2½ cups unsweetened shredded coconut
1 tablespoon baking powder
2 teaspoons salt
2¾ cups sugar
1 cup (2 sticks) unsalted butter, room temperature
5 large eggs
½ cup coconut oil, warmed to melt
1 cup buttermilk

Frosting
4 cups unsweetened coconut flakes
2 8oz packages cream cheese, room temperature
1½ cups (3 sticks) unsalted butter, room temperature
1½ tablespoons plus ¼ cup Southern Comfort
½ teaspoon salt
5 cups powdered sugar

Directions

Cake
Arrange oven racks in top and bottom thirds of oven; preheat to 350 degrees. Coat cake pans with nonstick cooking spray; dust with flour. 
Whisk 2¾ cups flour and next three ingredients in a medium bowl.
Using electric mixer, beat sugar and butter at medium speed, occasionally scraping down sides of bowl, until smooth, 3-4 minutes. Add eggs one at a time, beating to blend between additions. Beat until light and fluffy, 2-3 minutes. Gradually beat in oil. Beat in dry ingredients at low speed in 3 additions, alternating with buttermilk in 2 additions, beginning and ending with dry ingredients. Divide among four 9" cake pans (about 2 generous cups per pan); smooth tops with spatula.
Bake until a tester comes out clean 22-27 minutes. Transfer pans to wire racks; let cool in pans for 5 minutes. Invert cakes onto racks, let cakes cool completely. Leave oven on if making coconut topping immediately after.

Coconut Topping
Preheat oven to 350 if not already on. Place coconut flakes in a single layer on a rimmed baking sheet lined with parchment paper. Toast until some of the chips are golden brown (some will remain white) about 5-7 minutes. Check frequently and toss in oven a few times. Let cool completely.

Frosting
Can be made 3 days ahead and stored in airtight container at room temperature.
Using and electric mixer, beat cream cheese and butter on high speed, occasionally scraping down sides of bowl, until smooth and creamy, 2-3 minutes. Add 1½ tablespoons Southern Comfort and salt; beat to blend, about 1 minute longer. Add sugar; beat on low speed to blend. Increase speed to high; beat until fluffy, 5-6 minutes.

Assembly
Using a long serrated knife, cut each cake in half horizontally. Place 1 layer, cut side up, on a cake stand or plate. Lightly brush with about ½ tablespoon of Southern Comfort. Spread ½ cup frosting over. Repeat with remaining 7 layers, Southern Comfort, and frosting. Chill cake for 30 minutes. Leave remaining frosting at room temperature.

Cover sides of chilled cake with frosting. Cover cake loosely with foil and chill overnight.
Keep chilled. Let cake stand at room temperature for at least 30 minutes. Gently pat handfuls of toasted coconut chips over sides and top of cake and serve.

Wednesday, August 15, 2012

Ice Cream Cake


I scream. I scream for ice cream.


And for ice cream cake...
I will explode from pure joy.

Ice cream is one of my favorite desserts. My guilty pleasure. I will always go out of my way for a good scoop or two plopped on a cone. 
 (...ew the word plopped does not sound appetizing.)

Hey, we all need a little sweet somethin somethin after a long day.
And this is a whole lotta sweet somethin for ya.

I love my life right now. I would like to marry this ice cream cake. Who needs men?! 
Get me a bowl and some ice cream and I'm a happy girl

Ice cream > boys. every day.

The great thing about ice cream cakes is the fact that there are soo many different combinations of flavors and toppings. So many different possibilities!

Feel free to use this recipe as a guide and use any type of ice cream you want, with any toppings you want, and any kind of cookie crust you want! It's all up to you! You've got the powa!

I did a cookie crust bottom with a cookie crumb middle filling, and a ganache topping. But do whatchu want mmkay.

If you're looking for something to indulge in, this is it. 
Warning: this cake is not healthy. This cake is deadly. Beware. This cake hurts so good. Ouch.

Therefore, the best way to enjoy this cake is with a big bowl and spoon, sittin around with your favorite gals who can appreciate the beauty of ice cream in the form of a cake monstrosity. 
That was my choice of action, and it made for a perfect night.

So unbutton your pants ladies, grab a spoon, and please just indulge in this wonderful cake. It is so worth it. 
Come on. You work hard, you deserve this.
Oh, and you're welcome :)


 Layers of pure goodness. 
Not one, but two layers of crunchy cookie, in between smooth ice cream. Topped with ganache, whipped cream, nuts, and chocolate. WHAT EVEN.
It's like a giant ice cream sundae party grew uncontrollably into a giant cake!
My dream come true

The cake will get melty and messy fast. That's okay though, with spoon in hand, you can clean up any extra drippings. 

Indulging is a good thing. Just let go of those feelings of guilt, and enjoy the ice cream.
Portion control people. Small portion, less hatred for yourself.
Everything in moderation is okay
 Life is short, eat the cake.

Everyone needs to experience a homemade ice cream cake at some point.
Just like pearl earrings and a little black dress, it is a necessity.


Ice Cream Cake

adapted from: aidamollenkamp.com


Ingredients:


Crust
7 tablespoons unsalted butter, melted
8 ounces Oreo cookies (I used the remaining sleeve of Oreos from making the filling and made up the remainder with some graham crackers, feel free to use any kind of cookie you want)

Filling
2/3 of a package of Oreo cookies (2½ cups of Oreo crumbs)
7.25 ounce bottle Magic Shell ice cream topping

Ganache
4 ounces dark chocolate

½ cup heavy cream
1 tablespoon unsalted butter

Assembly
1 quart of dulche de leche ice cream
1 quart of french vanilla ice cream
1 cup chilled heavy cream
Unsweetened cocoa powder
A few handfuls of roasted salted peanuts
A few handfuls of dark chocolate chips

 Directions:


For the filling:
Crush the Oreos so you get 2 1/2 cups Oreo crumbs. Pour the Magic Shell topping over the cookie crumbs and mix well to combine. Set aside until ready to assemble.

For the crust:
Using a pastry brush, coat the inside of a 9-inch springform pan with 1 tablespoon of the melted butter. Cut parchment paper the same size as the base of the pan and place it in the base.
Place cookies in the bowl of a food processor and pulse until ground; add remaining 6 tablespoons melted butter and pulse until mixture is moistened. Press mixture evenly and firmly into the bottom of the prepared pan and freeze until it’s good and set, about 30 minutes. Meanwhile, take the ice cream out of the freezer to soften and make the ganache. 

For the ganache:
Place chocolate in a medium heatproof bowl; set aside. Place cream in a small saucepan over medium heat and bring to a simmer. Pour cream over chocolate and let stand until chocolate has melted, about 5 minutes.
Stir gently until smooth then stir in butter until completely incorporated; let cool slightly before using. Meanwhile, let the ice cream soften, for another about 15 minutes, or until soft enough to spread like room temperature butter but not melted. 

For the assembly:
When ice cream is softened, and transfer to a mixing bowl. Using a rubber spatula mix until spreadable. Spread vanilla ice cream over the cookie crust and smooth the top. 
 Spread Oreo filling over the vanilla ice cream.
Place in the freezer until it has firmed up a little bit, about 10 minutes
Remove dulche de leche from the freezer and let soften about 15 minutes. Mix again until spreadable. Spread dulche de leche ice cream over Oreo filling, level the top of the cake.
 Pour the ganache on top, smooth it, and freeze until the whole cake is very firm, at least 3 hours and up to 1 day.


Remove cake from the freezer and let sit at a few minutes at room temperature before cutting. Meanwhile, place whipped cream in a clean, large bowl and whip with a whisk until soft peaks form. Release and remove the sides of the springform pan
Top cake with whipped cream, cocoa, peanuts, chocolate chips.
Cut cake into wedges with a knife and serve

Monday, August 13, 2012

Raw Cashew and Raspberry "Cheesecake"


Life is full of unexpected instances. Sometimes people do things that surprise you, that change first impressions. And sometimes you can find sweetness in something seemingly ordinary.

Little surprises are good, they keep us on our toes so life isn't dull. 
Unless your husband/boyfriend turns out to be a woman. Bad surprise.
Oh and I may just be watching too many daytime talk shows...

Today had its fill of little surprises and one was in the form of this raw nut cheesecake.
But it's not really a cheesecake. It just wants to be.
This little cake is supposed to be filled with fat-laden cheese and sugar...BUT its all an act!

It just SEEMS like cheesecake should always be fatty and unhealthy, but really it can be wholesome and healthy! whatwhat

Instead of a cheese filling, this cake has a filling of raw nuts, honey, and oil. And that's it! Simplicity is key to nutrition. The shorter the ingredients list, the healthier it is. 

This cake is surprisingly satisfying and sweet. The filling is silky and smooth. So cheesecake can indeed be a guilt-free, good for you treat! Yay!

Eat cheesecake. Feel good. Success.


Necessary:

 Pulverize the nuts and dates!
Bam! Instant healthy cheesecake crust.

Blend the nuts reaaaal well in the food processor for a smooth filling. 
The berries make such a beautiful natural color

 I liked to serve the cake straight from the freezer it gave it a nice texture and it was nice and chilly!

 A cheesecake with natural, raw ingredients! It seems impossible, but people, this is real life.

 I love the different layers of this cake. Simple, chic, delish.

 Hello!


Raw Cashew and Raspberry "Cheesecake"


Ingredients:

 Crust:
1/2 cup raw almonds (pecan or walnuts will also work)
1/2 cup soft Medjool dates
¼ tsp. sea salt

Filling:
1 ½ cups raw cashews, soaked for at least 5 hours, overnight is best
juice of 2 lemons
the seeds of 1 whole vanilla bean (or 1 tsp. alcohol-free vanilla extract)
1/3 cup raw coconut oil, melted
1/3 cup raw honey
1 cup raspberries (thaw completely if using frozen)

Directions:

1. Place nuts and dates in a food processor with sea salt and pulse to chop until they are to your desired fineness (process a finer crust longer than a chunky one). Test the crust by spooning out a small amount of mixture and rolling it in your hands. If the ingredients hold together, your crust is perfect. Scoop out crust mixture in either a 7” spring-form pan or a 7" cake pan or even a pie plate, just make sure you line it with saran wrap. Press firmly, making sure that the edges are well packed and that the base is relatively even throughout. Rinse food processor well.

2. Warm coconut oil and honey in a small saucepan on low heat until liquid. Whisk to combine.

3. Place all filling ingredients (except raspberries) in a food processor and blend on high until very smooth, it may take a few minutes.

4. Pour about 2/3  of the mixture out onto the crust and smooth with a spatula. Add the raspberries to the remaining filling and blend on high until smooth. Pour onto the first layer of filling. Place in freezer until solid.

5. To serve, remove from freezer 30 minutes prior to eating. Run a smooth, sharp knife under hot water and cut into slices. Serve on its own, or with fresh fruit. Store leftovers in the freezer

Thursday, August 9, 2012

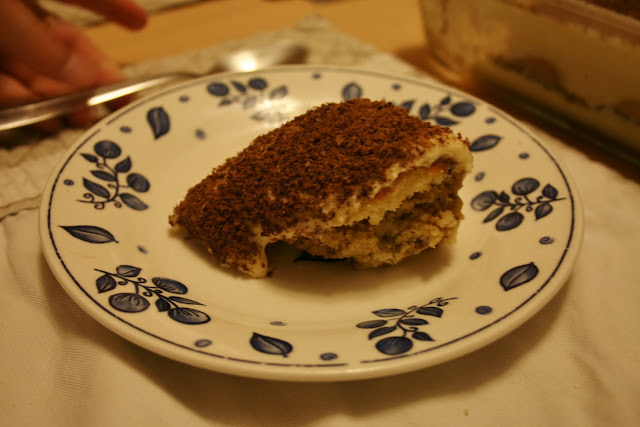
Tiramisu


Every time the Olympics comes around, it's just like a giant smack in the face for my self-esteem.
 I mean come on, winning a dog-gone gold medal when you're 16?!
What was I doing when I was 16??
Picking my nose, that's what.

But for realsies. These athletes are insane in the membrane. I have so much respect for their lifestyle and dedication to their sport. Amazing, incredible beast people. Athletes are powerhouses of emotional and physical strength and I seriously envy them.

Sometimes I like to imagine myself in the Olympics. Maybe I'd be a bicycler. Or a rower... those women are hardcore.... Or a speed walker. (real sport. no joke.)

Note to self: stay away from sports requiring leotards. Wedgie city.

...Hey, if changing your mind was an Olympic sport, I'd take gold.

BUT enough feelings of inferiority towards muscular athletes, it's time to bake more dessert! Tiramisu seems like a good idea because well tiramisu is never not a good idea.

Now tiramisu is often thought of as only being served in fancy Italian restaurants.
But hold up, wait a minute.

Tiramisu is easy!
 That's right I said it. This recipe was simple and straightforward. 
Don't be insecure! You can totally make Tiramisu a common appearance in your house. Like an old friend that always knows how to cheer you up.

Boom. Just like that. Sophisticated dessert on your table, in your belly.

 Baking for the win!!

 The key is in the mascarpone filling. Fluffy and elegant to delight your taste buds.
You should be buds with this taste. Hah get it? Taste buds..yeah, yeah?
okay.

 Fold and fluff

Assembly in action. 
Some cookies must be severed in order to fit in. Hey, that's how life works sometimes. 
Especially in high school...

We didn't bother with cutting into squares. We scooped and enjoyed. But feel free to be fancy!


Classic Tiramisu

From: Bon Appétit Desserts Cookbook

Ingredients:


1 cup freshly brewed espresso

⅔ cup sweet Marsala, divided
3 tablespoons plus ¼ cup sugar, divided
3 large eggs, separated, room temperature
8 ounces mascarpone cheese, room temperature
½ cup chilled heavy whipping cream
26 crisp ladyfingers (Boudoirs, Champagne biscuits, or savoiardi
½ ounce bittersweet or semisweet chocolate
1 teaspoon natural unsweetened cocoa powder, divided

Directions:


Stir hot espresso, ⅓ cup Marsala, and 1 tablespoon sugar in small bowl until sugar dissolves. Chill until cold.

Meanwhile, vigorously whisk egg yolks, remaining ⅓ cup Marsala, and ¼ cup sugar in medium bowl. Set bowl over saucepan of simmering water (do not allow bottom of pan to touch water); whisk until mixture is pale, thick, fluffy, and doubled in volume, and a candy thermometer registers 160 degrees F, about 3 minutes. Remove from heat. Whisk in mascarpone cheese until blended.

Using electric mixer, beat egg whites in large bowl until foamy. Add remaining 2 tablespoons sugar and bear just until firm peaks form. Fold egg white mixture into mascarpone mixture. Beat heavy cream in electric mixer until soft peaks form. Then fold into the mascarpone mixture.

Working 1 ladyfinger at a time, quickly dip in coffee mixture to submerge, turning to coat. Arrange ladyfingers in single layer in 9-inch square glass baking dish, trimming cookies to fit as necessary. Spread half of mascarpone mixture over ladyfingers. Using microplane grater, grate half of chocolate over mascarpone mixture, then sift ½ teaspoon cocoa over. Repeat with remaining ladyfingers, mascarpone mixture, chocolate, and cocoa powder. Cover and chill at least 3 hours.